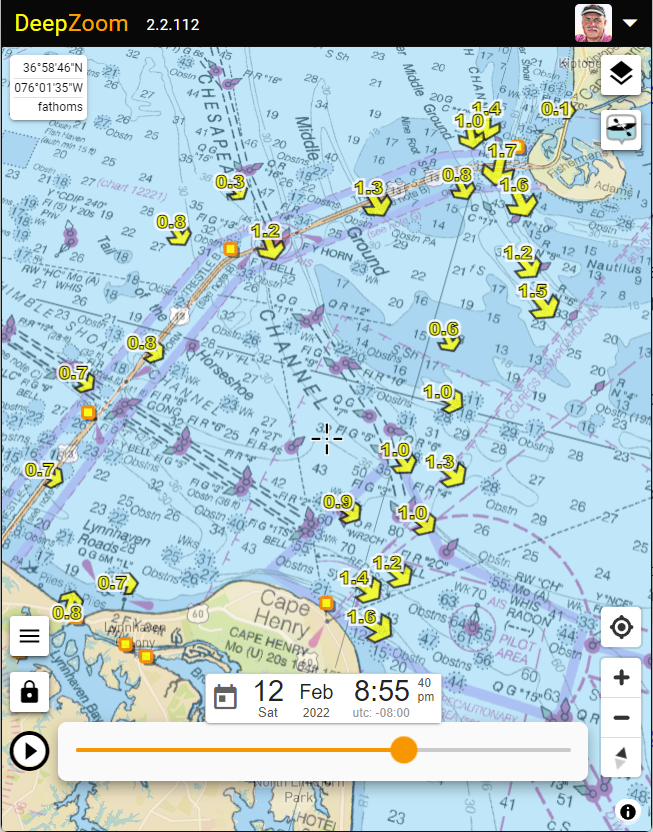
DeepZoom has always shown tidal currents as arrows at official current stations — NOAA in the US, CHS in Canada. Spatial Currents fills in the gaps: a continuous, color-coded, animated tidal-current field.
Turn it on and you get three things:
Color for speed. The scale is stepped in discrete bands, so equal-speed regions read as a filled contour.
Streamers — show direction, speed, and structure.
Speed readout (optional) at the center crosshair, in your chosen units. Off by default, but you can enable this at Settings → Map → Show spatial current velocity at center, but, see below…
Like everything in DeepZoom it animates through time, so you can scrub to any date and time and watch the whole field flood and ebb.
Where it comes from
The data is the ADCIRC tidal constituent databases: EC2015 for the Atlantic, Gulf, and Caribbean, and ENPAC15 for the Pacific coast including British Columbia and southern Alaska. They were produced by the University of Oklahoma together with NOAA’s Coast Survey Development Laboratory, using the ADCIRC coastal circulation model developed at UNC Chapel Hill and Notre Dame. Together they model the coastal ocean as an unstructured triangular mesh of roughly two million nodes, refined down to tens of meters inside harbors and inlets.
At each node the database stores the amplitude and phase of several dozen tidal constituents — the same M2, K1, O1 and friends behind the station tide predictions DeepZoom already computes for NOAA and CHS tide stations.
Why it won’t match the current tables — and why that’s expected
You’ll likely notice discrepancies between Spatial Currents and the NOAA/CHS current station arrows. It’s not a bug. The two models are answering slightly different questions.
A NOAA current station is local truth; the Spatial Currents field is a regional model. NOAA and CHS derive their predictions from harmonic analysis of actual current measurements at an exact geographical location, so they capture the reality of that particular spot. Spatial Currents is a smooth regional model — excellent for the big picture, but only approximate at any single point.
Depth-averaged vs. a specific depth. The ADCIRC field is a single depth-averaged velocity for the whole water column. A NOAA/CHS prediction is for a specific depth — usually well up in the column, where the water runs faster than the column average. Even with a flawless model, comparing a depth-average against a near-surface reading can differ wildly.
Currents are spatially violent, and current stations sit in the worst spots. Speed can double over a few tens of meters near a sill, a narrows, or a headland — and current stations are almost always placed in exactly those pinch points (Deception Pass, Cape Cod Canal, Seymour Narrows).
Currents are harder to model than tide height. The ADCIRC databases were validated mostly against tidal heights, where they’re very good — errors of a few percent. Velocity is essentially the gradient of the height field, which amplifies every small error, and the sharp flood/ebb asymmetry of a real rapids depends on shallow-water overtides that a regional model under-represents.
The practical rule: where a current station exists, trust it. Use Spatial Currents for what the stations can’t give you — the shape and timing of the flow between stations, across a whole region at once. Expect the biggest disagreements precisely in the strong, narrow rapids boaters care about most, for all the reasons above.
Say hello to the new radar layer courtesy Iowa Environmental Mesonet. Color coding of the dBZ intensity levels follows NOAA conventions. The radar layer auto-updates every 5 minutes.
dBZ
What it means physically
< 20
Tiny droplets — light drizzle, mist, or insects/birds
20–30
Light rain, small drops
30–40
Moderate rain
40–50
Heavy rain, possible small hail
50–60
Very heavy rain, likely hail mixed in
> 60
Large hail dominant — rain contribution is secondary
It’s fun to compare actual dBZ radar moisture radar against NOAA GFS rain forecasts as in the demo above.
Note that if you toggle on the radar layer, the timebase switches to one hour duration, starting one hour prior the present moment. If you toggle the radar layer off, the timebase returns to its previous setting.
UI changes
I’ve spent a ridiculous number of hours prototyping different UI controls for layer selection, all of which were icon based. Then my friend Andy questioned the cognitive load of icons vs just WORDS, and I felt a lightbulb go off in my head.
Click the right side of the control (the opacity level), to control the opacity without toggling the level on / off.
Selecting public markers to view has now moved into the Settings.Markers dialog.
AI Usage
Somehow, my Anthropic key leaked and hackers were gobbling up my AI credits at a rate of $10/hour. Yikes! To limit future damage, Claude use per subscriber now has the following limits:
Subscribers now receive $2.00 AI credits at each renewal.
Lifetime subscribers receive a flat $30 AI credits.
I doubt anyone will reach these limits (I’m personally at about $2 after many months of frequent usage), and if so, we’ll add some mechanism to buy more credits.
Bug fixes
The British Columbia provincial decision to avoid biannual DST transitions required updates to moment-timezone.
In fact, it’s this long-standing colloquial usage that is causing consternation on the tzdb list at the moment. Due to this poorly-consulted decision from the BC government, the term “Pacific Time” will now mean two completely different time offsets for half the year, depending on where it’s used. issue has been resolved.
Note that the abbreviation that’s coming from tzdb is “MST” (Mountain Standard Time), not “PT”, because of the compatibility concerns mentioned above.
So BC in the MST timezone year around going forward.
Finally added Canadian tides and currents. These are derived from the API at Canadian Hydrographic Service, and thus presumably “exactly” match official distributions.
For the moment only 2026 is available, and the CHS API only supports a limit future range. But future predictions await the release of
an update to the time processing package used by DeepZoom called moment-timezone. This is complicated by the recent change to DST for British Columbia.
The somewhat hilarious holdup is that the BC Parliment chose a name for the new Timezone designation which overlaps preexisting usage.
In fact, it’s this long-standing colloquial usage that is causing consternation on the tzdb list at the moment. Due to this poorly-consulted decision from the BC government, the term “Pacific Time” will now mean two completely different time offsets for half the year, depending on where it’s used.
So I’m holding off on extending the prediction horizon until this is resolved.
Bug Fixes
DeepZoom has possibly forever miscredited some percentage of user subscriptions. Somewhat randomly, accounts were either overcredited or undercredited for the subscription ending date. DeepZoom was misinterpreting a field from a Stripe webhook describing the transaction. Uff da! I am massively sorry!
I believe all accounts have been corrected. If you feel your account has not been properly credited please contact jay @ deepzoom . com.
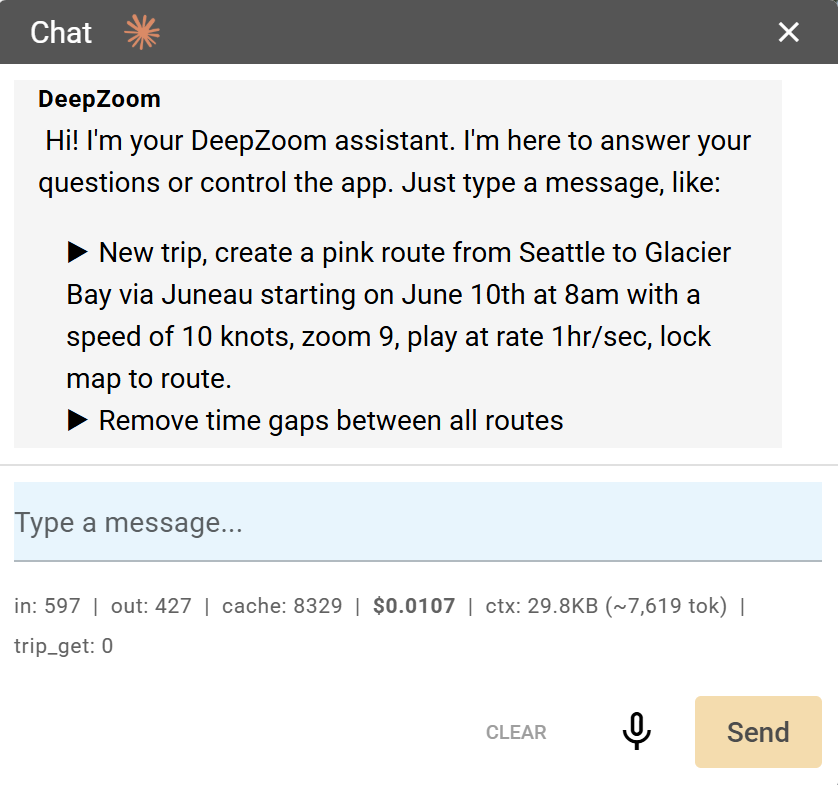
I know! Seems crazy at first, but there are a bunch of cool new features and simplifications that are possible by integrating Anthropic’s Claude into DeepZoom.
Hint You can click the right arrow to execute the sample commands.
Examples
Preface commands with “New Trip.” to remove existing routes and markers. Or you can delete by type “delete all routes”.
Routes
New Trip. Create three routes, the first from Seattle to Everett, the second from Everett to Bellingham, and the third from Bellingham to Vancouver. Each at a speed of 6 knots. Start each route on subsequent days. All departing at 9am in the morning. The first trip departs on July 4th. Make each route a different color.
color each route alternately blue, green, and red
make the first route start July 2nd at 10am, and the second route start two days later. Make the route to Vancouver begin when the second route completes.
delete all routes.
Markers
add a marker
create a marker with the name "HH:MM" and using a pin icon
change all markers to the fishing icon
create a JSON lat, lng array from the coordinates of all of my markers
General
What is a knot?
Show help
How do I get to Carnegie Hall
Hint When changing topics with Claude, it helps to press the “Clear” button to remove previous context.
Caveats
Claude makes mistakes! This is brand new code! Possibly buggy! Use at your own risk! Save often!
Claude’s responses are influenced both by the text you provide for each command and by the “System Prompt” used to acquaint Claude to DeepZoom’s universe of concerns. This “System Prompt” is unexpectedly tricky to get right, and Claude’s responses can vary with slight changes in emphasis and punctuation. Kind of a herding cats situation. The “System Prompt” is undergoing continuous refinement, and consequently you can expect your results will vary with each DeepZoom release.
Not all DeepZoom command features are yet integrated in the the Claude prompt. Let me know if there’s any additional automation features you’d find useful.
Wait, who’s paying for this?
Presently, Claude self-reports a cost of about $0.005 - $0.07 per call, although my Anthropic charges seem to be accumulating at a much higher rate :(
For the moment, I haven’t figured out how to charge high use users for this new feature. So it’s free for the near future, until either the charges get burdensome or I figure out some alternative. Any ideas, other than raising the price or requiring a separate purchase of a block of AI credits?
Update: Each subscription gets an automatic $2.00 AI credit. Lifetime subscribers get a $20 credit. AI keeps working until you drain your credits. In reality, I doubt any subscriber will reach this limit. After months of continuous developent/use, I’ve only hit this limit once. If you do, let me know (and what you’re doing since I’m curious) and I’ll add more credits to your account.
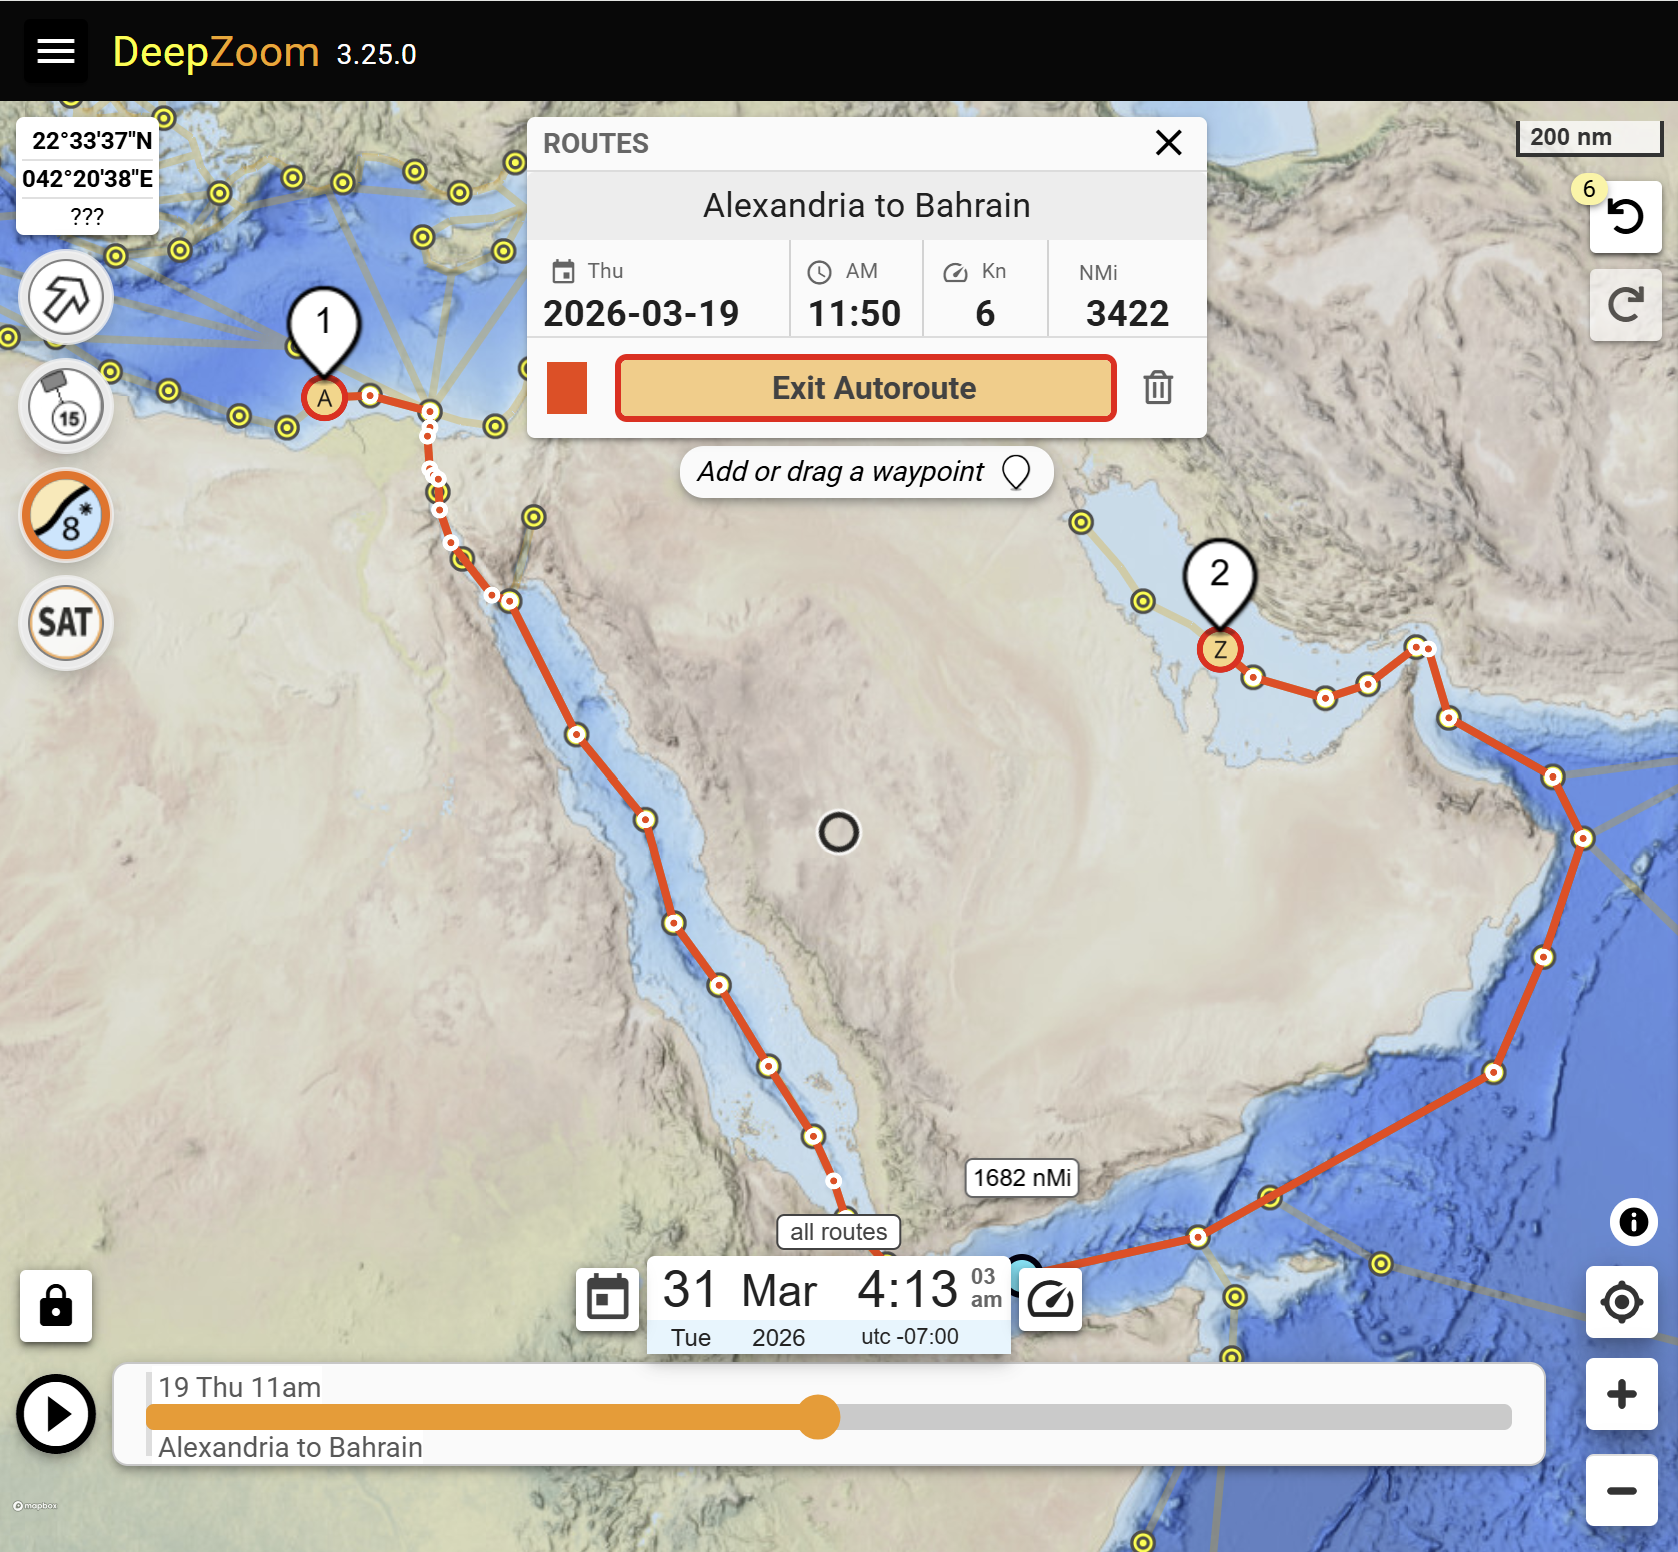
Autorouting network
Some additions have been made to the autorouting network, but it’s far from finished. But you can now sail around the world and even through the Strait of Hormuz if you’re feeling lucky.
By default, routes traversing the Northwest Passage are disabled, just because most sailors probably don’t want to use this shorter but more challenging option. But you can enable Northwest Passage routes by a checkbox in Settings.Routes. You’ll need to restart DeepZoom to have this change take effect.
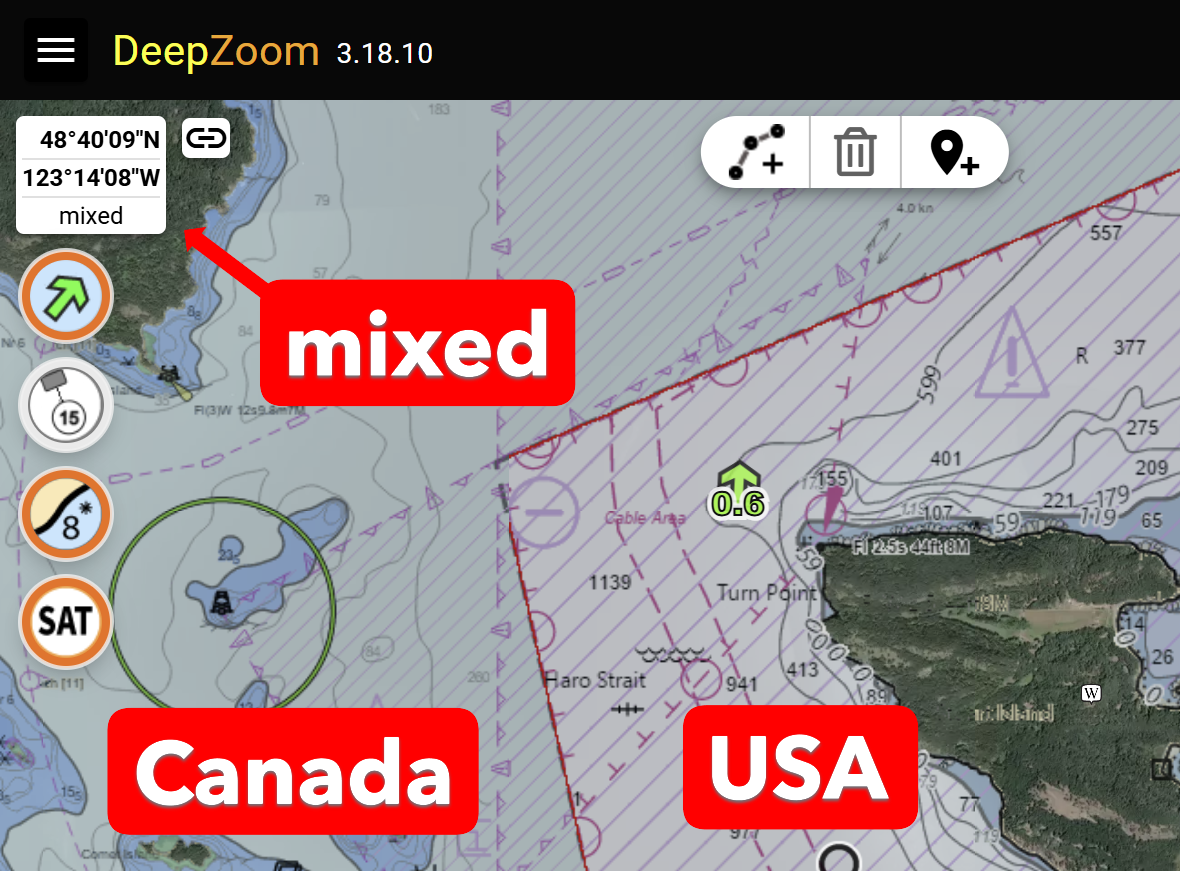
Nautical chart imagery has been added for Canada, Australia, New Zealand, and Norway.
Each country, and sometimes different regions within each country may use different datums for
establishing the zero reference point for depth measurements. For example, coastal USA depths are measured relative to mean lower low water (MLLW) in feet.
Charts for almost all of the rest of the world use metric units.
Coastal Canadian waters measure depths relative lower low water, large tide (LLWLT), while depths in the Great Lakes are referenced to International Great Lakes Datum (IGLD).
When DeepZoom displays chart areas with differing units, the units are shown as mixed, as below.
USA Tides and currents refresh
All of the USA tides and currents are now updated to the latest NOAA December 2025 data release.
Tide and current data is available between the dates of 2020.01.01 through 2040.12.31 inclusive.
Thanks, as always to David Flater (xtide) for collecting and publishing the .tcd files which I use to generate the the millions of
tide fragment files which enables DeepZoom’s rapid display.
International tide stations, NOT!
I attempted to add International tides using TICON-4 harmonics, but gave up when the results seemed close, but not close enough. See: (Github: deepzoom-ticon4). Just figuring out which of the differing online tidal websites was authoritative is the first hurdle. Then there is a dearth of information regarding datum and active time zone. So verification proved challenging.
If you feel like hacking away at the TICON-4 code, I’d be delighted to help!
Magnetic Variation update
DeepZoom optionally displays the magnetic heading for each leg of a route (see the Settings page). The model used to compute this value has been updated to the World Magnetic Model 2025-2030. (NOAA)
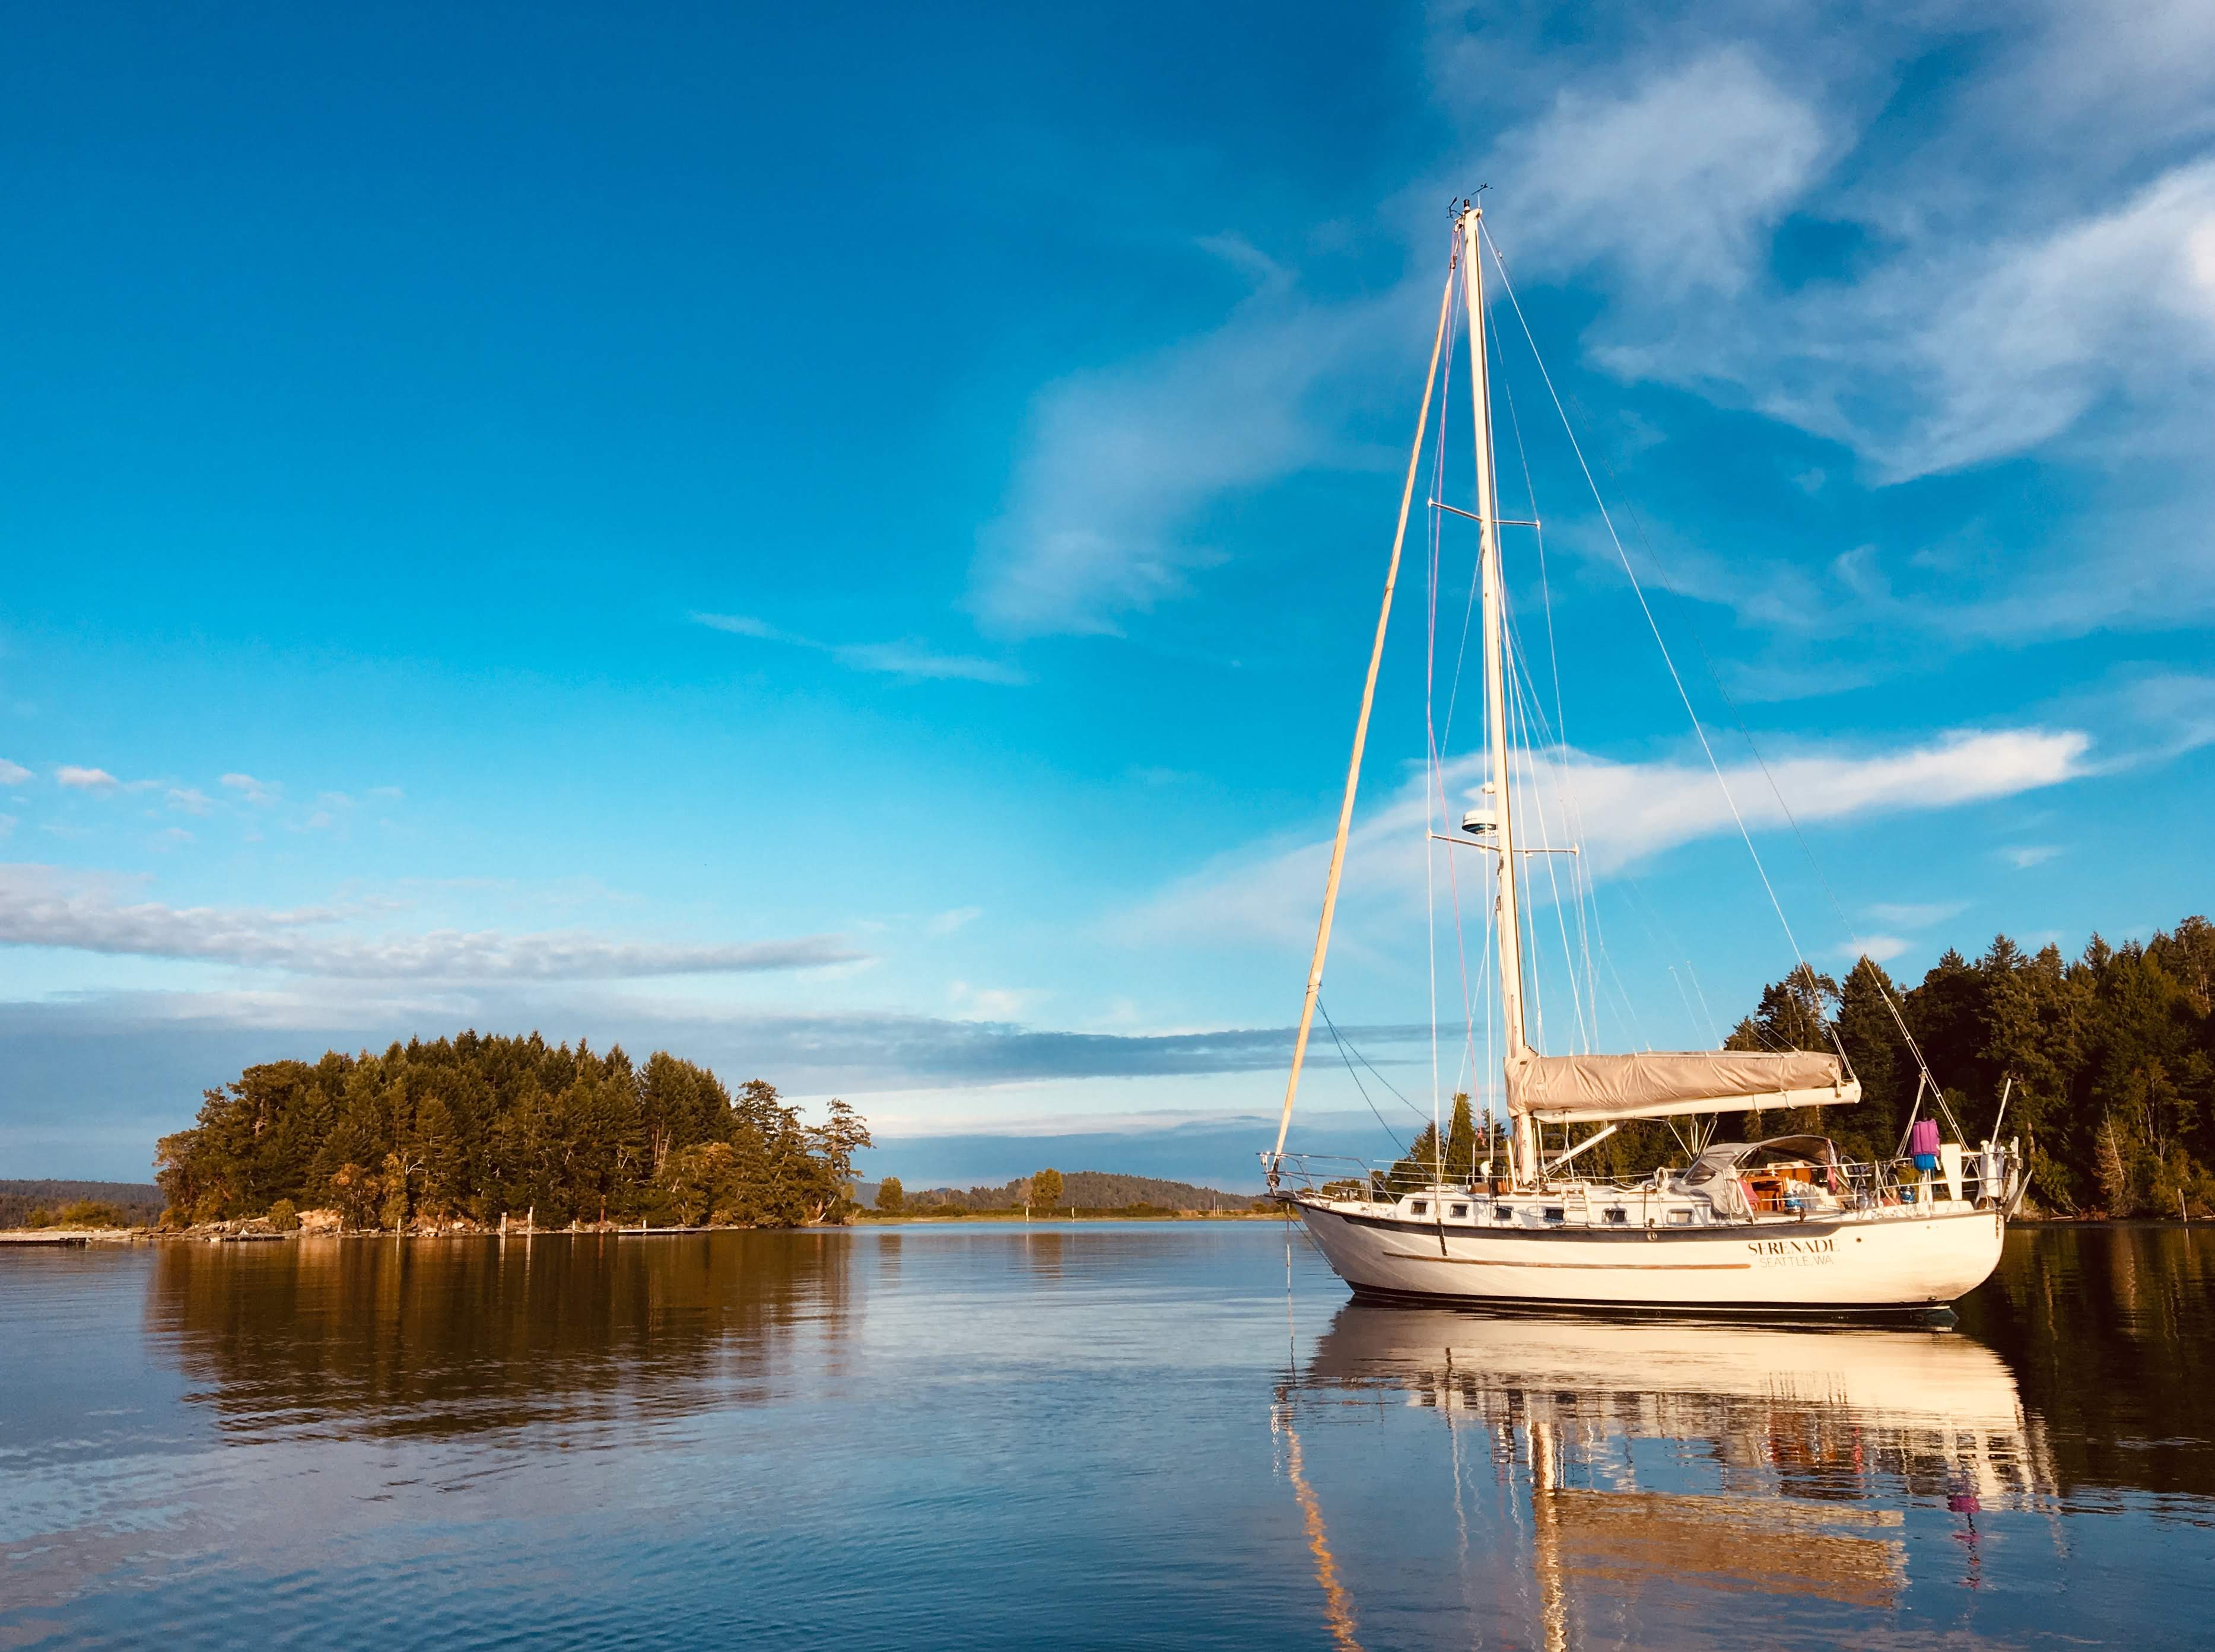
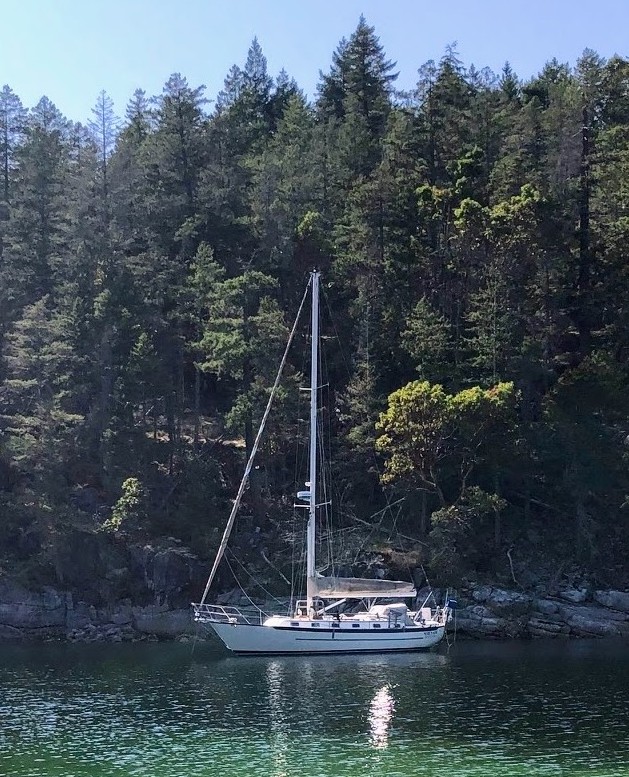
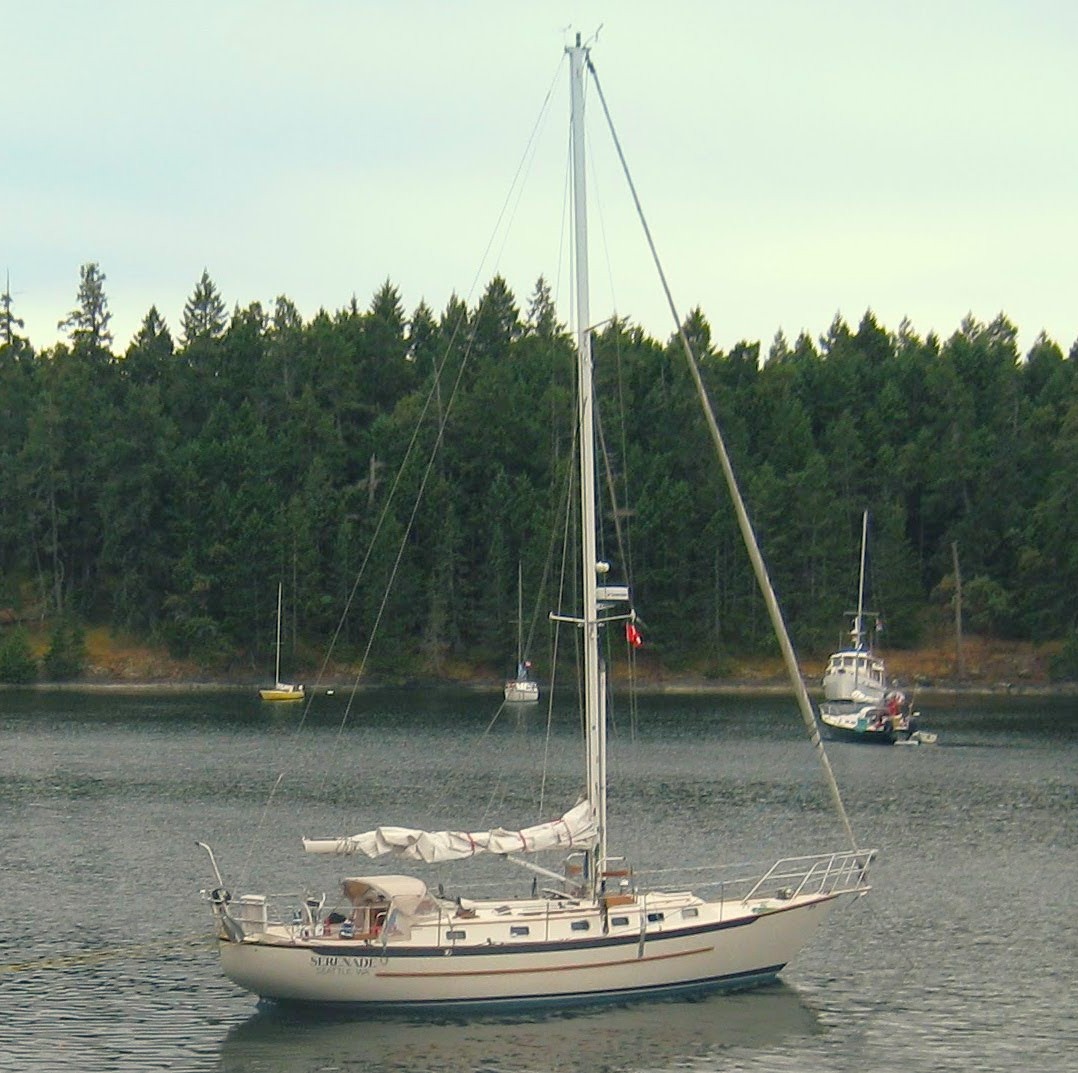
Serenade is for sale
It is with great sadness that we’ve decided to put Serenade up for sale. Serenade is a 1997 40’ Pacific Seacraft cutter designed by Bill Crealock. We have been through many adventures together over the last 25 years and I can vouch that Serenade is a sturdy and stalwart companion, a beautiful and safe haven in any and every storm.
The term “sea kindly” is used to describe this family of designs by Bill
Crealock. Having experienced rough weather in many situations, and soloed for weeks at a time, I’ve found Serenade to be reliable
and terrifically stable. No creaking, wobbling, and it takes a lot of wind to sink the rail. Yet, she can ghost along on a breeze.
While cruising last summer north of Vancouver Island, ML took a tumble while hiking (she claims forest trolls pushed her) and has had a two surgeries to fix a badly broken elbow. And I have a shoulder which is unraveling a few decades after a serious motorcycle accident, so it’s time to introduce Serenade to new traveling companions.
Just click (or tap and hold on touchscreens) near a small bullseye to add waypoints at the start and end of your route.
The route will be the shortest path through a predefined traffic network. Click on the route to add more constraint waypoints. Drag either end of the route, or the constraint waypoints to redefine the route.
Once you’re satisfied with the route, exit Autoroute mode. You can then further refine the route using the standard Manual route tools, moving waypoints, adding to either end of the route, or splitting the route into fragments.
Routes can be arbitrarily long and are pretty fast! Try something wild like starting a route in Anchorage, AK and ending in Newport R.I.
DEEPZOOM IS A PLANNING TOOL. DO NOT TRUST ANY AUTOMATICALLY GENERATED ROUTE FOR NAVIGATION WITHOUT THOROUGH REVIEW. AUTO CREATED ROUTES ARE NOT FILTERED BASED ON THE DRAFT OF YOUR VESSEL. SOMETIMES THE AUTO ROUTE IS ONLY A FEW FEET DEEP SUCH AS THE GULF ICW!
How it works
DeepZoom uses the “wisdom of the crowd” to define the auto routing network.
A heatmap of the frequency of AIS tracks over the course of a full year is used to create a network of nodes and edges.
Manual editing further refines the network, avoiding obstructions and shallow areas.
Each edge is a potential pathway.
Each node is a potential waypoint.
Auto routes are the the shortest path through the network between the waypoints you place at two or more nodes. The route follows waypoints you’ve placed in numerical order.
To remove a waypoint, drag it onto another waypoint which will merge them into a single waypoint.
Editing and verifying the network is a massive undertaking. I started with waters I’ve frequented, and expanded from there. Feedback is welcome! What works, what doesn’t.
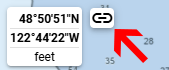
The best way to show an error is either a screen shot with LatLong displayed, or click on the copy link button in the upper left corner of the display and paste that into an email
to jay at deepzoom.com.
Do you have an interest in helping edit the network? If so, drop me an email, again jay at deepzoom.com.
Other new features
Routes are auto named in the format “Start to Finish”. If you reverse the route, the route name is also reversed. If you name a Trip in the format “Start to Finish”, reversing the whole trip will swap the Start and Finish names.
You can disable auto renaming at Settings.Routes.NameRouteFromEndpointLocations. If you manually edit a route name, your edits will be preserved.
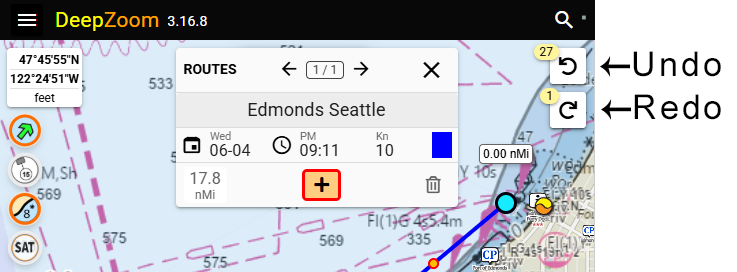
When manually editing a route, you can now extend the route from either the start or end waypoint. Select the waypoint, then click the “+”.
Any operation which alters geometries is automatically saved in an undo stack.
This includes adding, moving, and deleting markers or routes, as well as reversing routes or trips.
The entire state of the trip (routes, markers, and scripts) as of that moment is saved as a snapshot.
The size of the undo and redo stacks is not limited.
Any new geometry change resets the redo stack. Loading or saving a trip resets both the undo and the redo stacks.
Note that changes which do not affect the geometry are not automatically saved.
So modifications to say route start time or route color are not saved unless the geometry is affected.
While this may seem like a somewhat arbitrary distinction, undoing state with no immediately visible
outcome didn’t seem user friendly.
The undo / redo buttons are only visible when in editing mode.
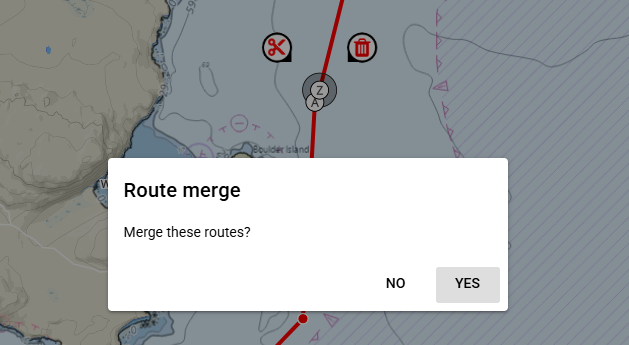
You can now merge routes by dragging endpoints together. The route endpoint being dragged is the source route, the other route is the destination route.
The name, direction, speed, and color properties of the destination route are preserved.
Other new features
An account now includes boatname, which is going to be displayed as part of a future tracking feature.
Added webcam marker icon.
Added bidirectional client/server communication using signalR. At present this is used to indicate when the server will be going down for maintenance.
Bug Fixes
Markers were sometimes not saved in a trip. Doh! Sorry! Fixed.
Improved route editing by eliminating spurious route snipping and vertex deletion.
DeepZoom Links are created using the clipboard copy button, above. Links now include relevant state values such as date and time, playing/paused status, duration, location, zoom, layers, weather and opacities, and tide station, buoy, or marker selected.
This makes it easy to share conditions at a particular location. Note that routes, tracks, and private markers are NOT included in the link.
To share these items, you’ll need to continue sharing a trip.
The goal here is to make sharing easier without the necessity of logging in, creating, naming, and saving a trip. In summary, there are now three methods of launching DeepZoom while specifying initial content:
Type
sample url
contents
where is it?
Trip
https://www.deepzoom.com/trip/dwmfjt2f
all routes, tracks, and private markers
Trips.Share
Marker
https://www.deepzoom.com/marker/GNIS1512376/0/
just select a marker
Copy Link on info tab dropdown
Clipboard
https://www.deepzoom.com/s/20250101-Gori7e5ZYP
most state except routes, tracks, and public markers
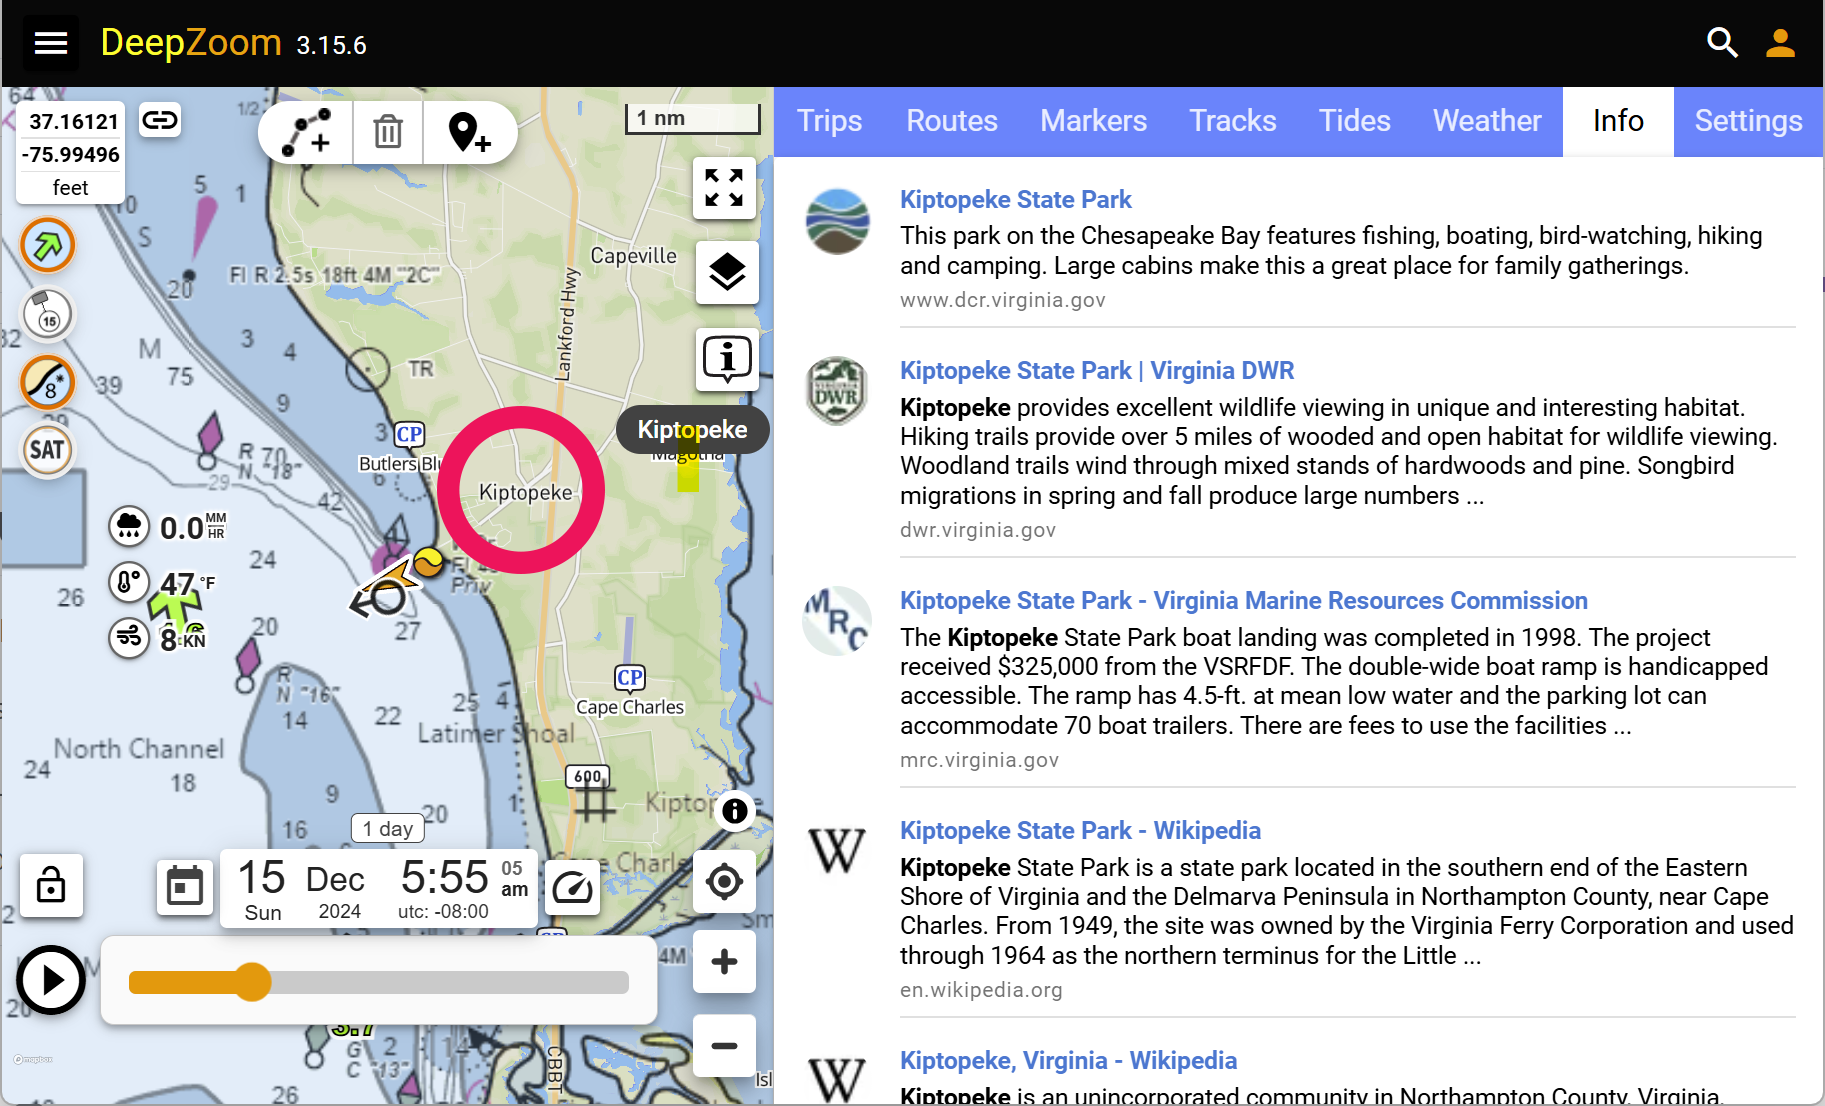
You can now get search results (links) for points of interest (POI) and major geographical locations like parks, towns, mountains, and airports within DeepZoom. Just click on the POI.
Search reults are advertising free and are provided by Brave Search. .gov and .org sites are prioritized. Unfortunately, Brave only filters search results to the country level (instead of state or some finer granularity), so there can be spurious results if the search text isn’t fairly unique.
Other new features
You can now change the trip departure date without time jumping back to the beginning of the first route.
When performing a location search, a marker is now automatically added.
Bug Fixes
You can now export and then import a DeepZoom trip in .gpx format with minimal loss of information.
Improved tide and current station click selection accuracy.
When editing documents, don’t follow links if they are clicked.
Reduced jitter of position marker when animating.
Reduced number of entries in the time zone list. Color coded entries for easy selection. Results of changing zones are updated in UI immediately.
Performance improvements.
Scripting
Script dialog wasn’t always setting the relative time properly.
Added a new event showDialog to scripting. Scripts can now programmatically open: trip-find, login, register, account, search, forgot-password, help, splash, about, demos, payday, add-public-markers, timebase, rate.
The selectMarker event now works with NDCB buoys and Wikipedia locations.


 to add waypoints at the start and end of your route.